Set up GenICam-compliant cameras
You can set up GenICam-compliant cameras in advance to include them later in configurations for data recording or inference. Alternatively, you can set up cameras when creating camera configurations. You can download the camera configuration file from the eBUS Player. The detailed user guide for the eBUS Player can be downloaded from the Pleora Support Center.
Supported pixel formats
The current implementation of the GenICam standard supports the following pixel formats:
- Mono8
- RGB8
- BayerGR8
- BayerRG8
- BayerGB8
- BayerBG8
Note that the desired pixel format needs to be supported by both Robovision AI and the camera itself. For example, Basler cameras support only BayerRG8 from the Bayer formats family.
To set up a GenICam-compliant camera
- On the menu, go to System > Camera management.
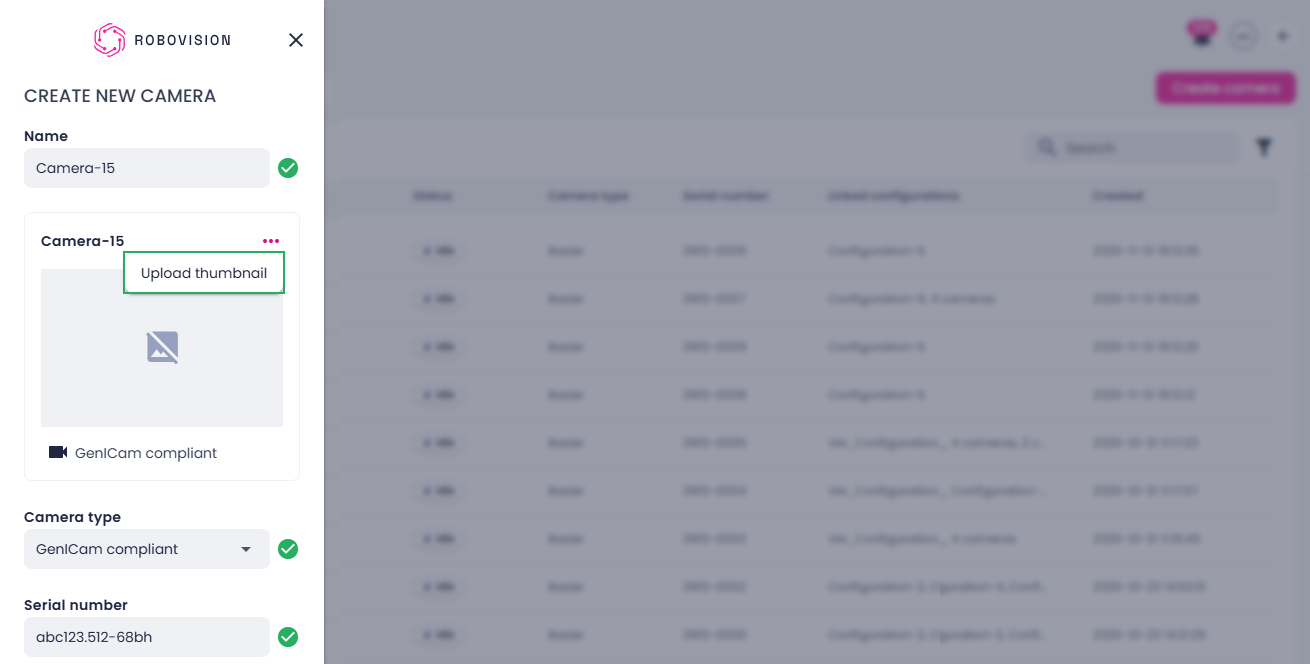
- On the Cameras tab, in the upper-right corner, click Create camera.
- If necessary, edit the default camera name.
-
To upload a camera thumbnail from your computer:
- Next to the camera name, click the ellipsis button.
-
Select Upload thumbnail.
-
Select an image on your computer, and then click Open.
-
Ensure the GenICam compliant camera type is selected.
-
Enter the serial number.
The GenICam device serial number must include up to 255 alphanumeric characters, hyphens, dots, and @ signs.
-
Click Create.
The added camera appears in the list of cameras and can be used in camera configurations. To use a camera in a camera configuration, the camera must have the Idle status displayed in the Status column.
On the Cameras tab, you can also:
Add a missing parameter to the configuration file
The *.pvcfg configuration file downloaded from the eBUS Player does not contain all camera parameters. The number of parameters saved in the *.pvcfg file depends on the camera manufacturer. If a required parameter is missing, you can add it to the configuration file. For this:
- Run eBUS Player.
- Open the camera, and then select Tools > Save XML. eBUS Player saves the GenICam XML schema for your camera. The file contains parameter definitions but no values.
- Edit the saved XML file and add
<Streamable>Yes</Streamable>tag to parameters that you want to be exported to the *.pvcfg file. - Before reconnecting to the camera with eBUS Player, go to Tools > Default GigE Vision Communication Parameters.
- Scroll to DeviceGenICamXML Access, change DeviceGenICamXMLlocation to File, and then in DeviceGenICamXMlFile, enter the path of the edited XML file.
Next time you save the configuration file, it will contain your tagged parameters
Pleora eBUS SDK license (optional)
GenICam-compliant cameras use the Pleora eBUS SDK. Without a license, a watermark appears on captured images. To remove the watermark, you need to purchase and install a Pleora license.
To install a Pleora license
-
To purchase an eBUS SDK license, go to the Pleora website, or contact Pleora directly.
You will need to provide the MAC address of the machine where the license will be installed.
-
To retrieve the MAC address of your machine, run the following command:
Look for the
link/etherentry of any network interface (typicallyeth0or similar). The MAC address format isxx:xx:xx:xx:xx:xx.Alternatively, use:
-
Replace
<interface>with your network interface name (for example,eth0). -
Once you receive your license file from Pleora, create the license directory on each node that will run camera workloads:
-
Copy your license file to the directory:
The license will be automatically mounted into the camera sidecar container when running camera workloads. You can verify that the license is correctly picked up by eBUS SDK by running the eBUS Player and checking if the watermark is gone from the camera image.
Note
The license directory must exist on each Kubernetes node that runs camera-related pods. The platform automatically mounts /etc/Pleora/licenses from the host into the camera sidecar.